
In this article we look at another Raspberry Pi Pico board, this one is the Cytron Maker Pi Pico and its a good one.
The Maker Pi Pico is a board for the Raspberry Pi Pico, it comes in 2 variants one of these has a Raspberry Pi Pico soldered and the other one you can add your own Pi Pico
The Maker Pi Pico can be programmed with CircuitPython, MicroPython and C/C++. Its as easy as connecting to any computer via USB, then drag and drop the file onto it to upload the program.
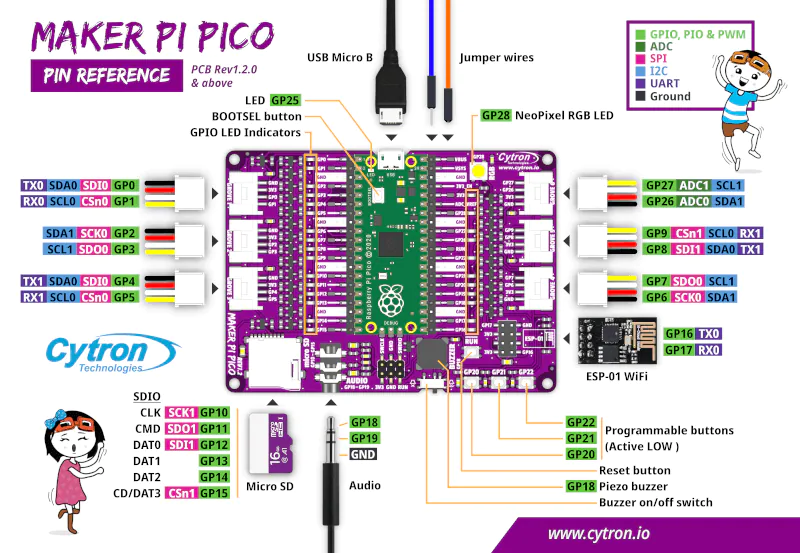
Here is an image of a populated board which also shows some of the on board features and its pinout
Features
- A Raspberry Pi Pico is included and is already soldered to the board
- There are 2 20 pin headers which provide easy access to all Raspberry Pi Pico’s pins
- There are LED indicators connected to all GPIO pins
- There are 3 x programmable push buttons which are connected to GP 20-22
- There is a NeoPixel RGB LED which is connected to GP 28
- There is a Piezo buzzer which is connected to GP 18
- There is a 3.5mm stereo audio jack which is connected to GP18-19
- There is an Micro SD card slot which is connected to GP10-15
- There is an ESP-01 socket which is connected to GP16-17
- There are 6x Grove ports
So as you can see there are a few features on board that mean you can get up and running straight away with the on board devices
Links
https://github.com/CytronTechnologies/MAKER-PI-PICO
Maker Pi Pico Datasheet
Maker Pi Pico Schematic Rev1.0.0-1.1.0 & Rev1.2.0.
Purchase
| Aliexpress | Link |
Examples
Here are some basic examples using the resources on the board
Blink an LED example
The common blink an LED using Micropython
import machine
import utime

# LED BLINKING

led = machine.Pin(10, machine.Pin.OUT)   # set pin 10 as OUTPUT

while True:
    led.toggle()     # toggle LED
    utime.sleep(0.5) # sleep 500ms
RGB led example
This is a basic RGB example in Micropython using the on board led
import array, time
from machine import Pin
import rp2
from rp2 import PIO, StateMachine, asm_pio

# Configure the number of WS2812 LEDs
# - There's 1x built-in RGB LED on Maker Pi Pico board
NUM_LEDS = 1

@asm_pio(sideset_init=PIO.OUT_LOW, out_shiftdir=PIO.SHIFT_LEFT,
autopull=True, pull_thresh=24)
def ws2812():
    T1 = 2
    T2 = 5
    T3 = 3
    label("bitloop")
    out(x, 1) .side(0) [T3 - 1]
    jmp(not_x, "do_zero") .side(1) [T1 - 1]
    jmp("bitloop") .side(1) [T2 - 1]
    label("do_zero")
    nop() .side(0) [T2 - 1]

# Create the StateMachine with the ws2812 program, outputting on pin GP28 (Maker Pi Pico).
sm = StateMachine(0, ws2812, freq=8000000, sideset_base=Pin(28))

# Start the StateMachine, it will wait for data on its FIFO.
sm.active(1)

# Display a pattern on the LEDs via an array of LED RGB values.
ar = array.array("I", [0 for _ in range(NUM_LEDS)])

while True:
    print("blue")
    for i in range(NUM_LEDS):
        ar[i] = 255
    sm.put(ar,8)
    time.sleep_ms(1000)

    print("red")
    for i in range(NUM_LEDS):
        ar[i] = 255<<8          # shift 8 bits to the left
    sm.put(ar,8)
    time.sleep_ms(1000)

    print("green")
    for i in range(NUM_LEDS):
        ar[i] = 255<<16         # shift 16 bits to the left
    sm.put(ar,8)
    time.sleep_ms(1000)

    print("white")
    for i in range(NUM_LEDS):
        ar[i] = 0xFFFFFF
    sm.put(ar,8)
    time.sleep_ms(1000)
Summary
If you want to get started with the Raspberry Pi Pico then this is a ideal starting point, it has enough extra features for beginners on the board and at a low enough price to be worth a purchase.